About these Small Batch Brownies
This is my go-to small-batch brownie recipe, perfect for a 9 x 5 inch pan. It’s ideal if, like me, you have a small household of 3 to 4 people and don’t want an excess of leftovers. My self-control around chocolate is practically non-existent, so this recipe is the perfect solution. You can enjoy your brownies, satisfy that chocolate craving, and move on to your next treat without the temptation of leftovers.
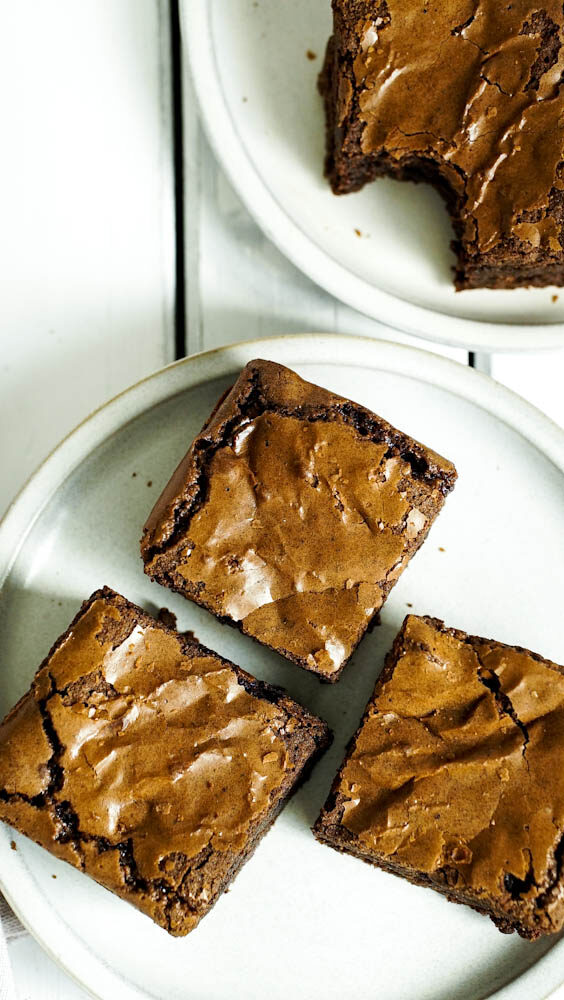
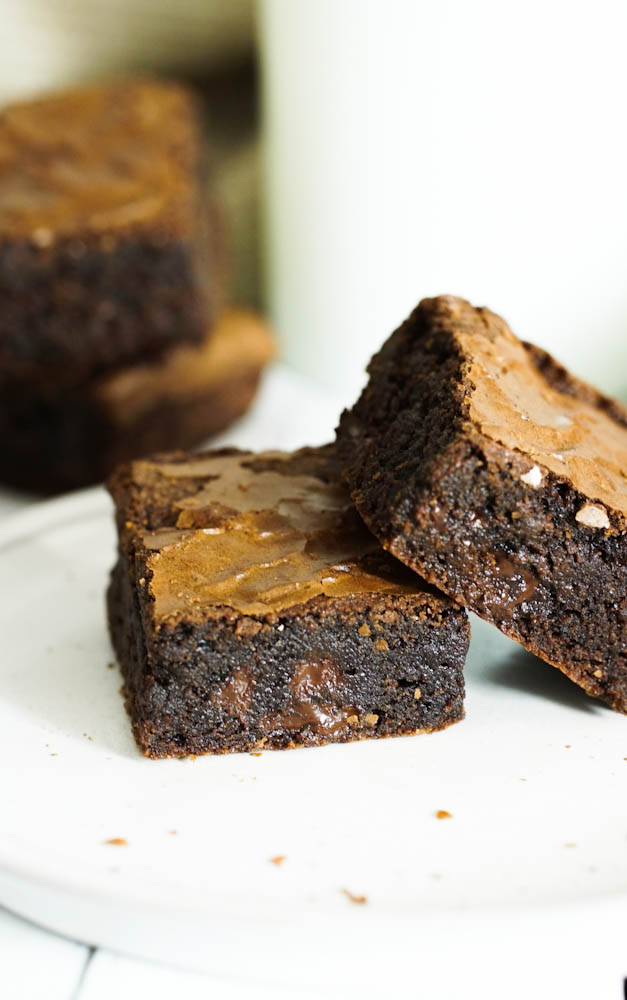
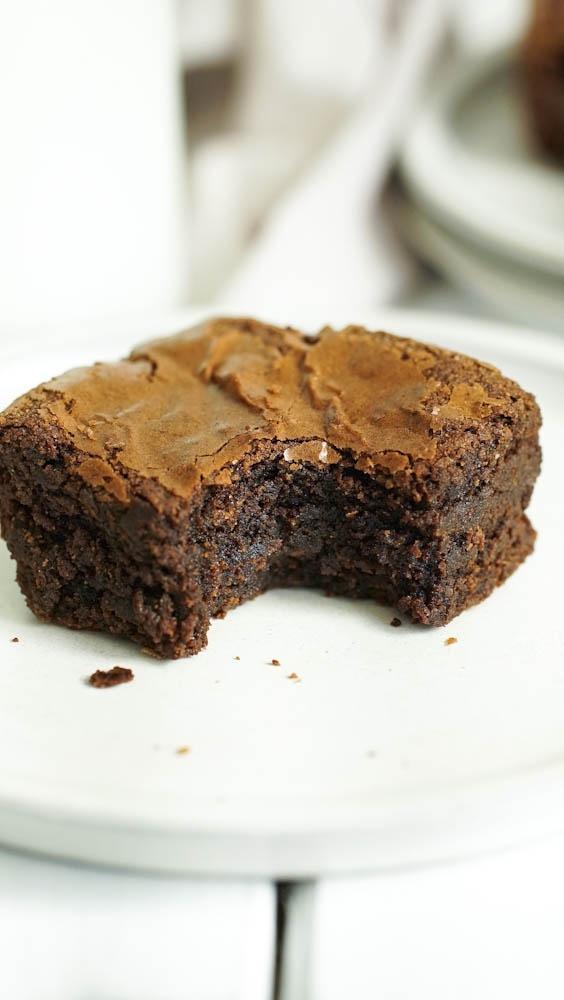
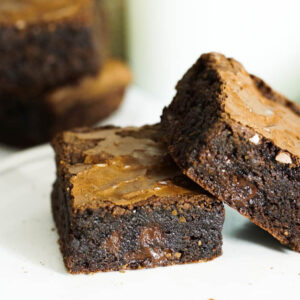
These brownies feature an amazing thin, crispy cracked layer on top and a fudgy, chewy center filled with small morsels of melted chocolate. The size of the pan ensures that every piece has that deliciously hard, crisp outer shell. Unlike larger pans where the middle pieces lack that crispness, each piece from this batch has a chewy outer edge, which I absolutely love—especially the corner pieces.
This small batch yields about 8 to 10 pieces, depending on how you cut them, each roughly 2 x 3 inches. If you have a larger group or want to freeze some for later (a smart idea if you anticipate future cravings), you can double the recipe. This way, you can enjoy your brownies now and have extras ready to satisfy those inevitable cravings for something sweet, whether it be cookies, cake, or another batch of these delightful brownies.
Equipment and Oven Prep
 Choosing the Right Pan – The journey to brownie perfection begins with a 9×5 metal (loaf) pan, specifically light-colored ones, the gold standard for achieving those coveted crisp edges and even cooking. However, if a glass pan is your only option, fear not – lowering the oven temperature by 25 degrees can save your chocolaty creation from a bitter burn.
Parchment Paper – Line your pan with two pieces of parchment paper for an easy lift-out and clean cut. This trick is practical and ensures your pan remains scratch-free and results in a waaaay easier clean-up. For a 9×5 pan, cut a 20×15 square of parchment paper. Grease the pan with spray and rub in. Cover with the parchment paper cut out and metal clips.
Cake Strips – Since the loaf pan is much more narrow and deeper than an eight or nine inch pan, you want to ensure that the batter bakes evenly. This will help prevent the top of the brownie from cracking due to trapped moisture bursting through the center. You can use cake strips or DIY strips with alluminum foil or with a few common kitchen items.
To create your strips at home for a 9×5-inch loaf pan, Cut a piece of foil 30 inches in length and fold it in half. (Optional: Wet paper towels and fold them in the middle of the foil.) Fold the foil one more time; these should total four folds. Tuck the foil ends into themselves and wrap them around the loaf pan, securing them with oven safe clips on the edges.

PRO TIP/ KITCHEN HACK
How to DIY Bake Strips – To create your strips at home for a 9×5-inch loaf pan, Cut a piece of foil 30 inches in length and fold it in half. (Optional: Wet paper towels and fold them in the middle of the foil.) Fold the foil one more time; these should total four folds. Tuck the foil ends into themselves and wrap them around the loaf pan, securing them with oven safe clips on the edges.
How to make Small Batch Brownies
1. Starting the Batter – In a large bowl, combine the sugar, oil, and vanilla and mix with either a whisk or an electric mixer. Once the ingredients are combined, add the room-temperature egg.
2. Whipping up the Batter – A light and fluffy mixture of eggs and sugar is the secret to achieving a crackly brownie top. This step introduces air into the batter. Whether you have a stand mixer or a strong arm, the goal is to whip until pale yellow and voluminous. 2-3 minutes at medium to high speed with a Kitchen Aid cordless hand mixer should do it.
3. Melting the chocolate and butter – Fill a small pot of water about 2 inches up and place a heatproof glass bowl on top. Cut the butter and chocolate and lay them in the glass bowl. On low heat, melt the chocolate and butter together. Once fully melted, whisk in the Dutch-processed cocoa powder.
4. Sifting into Greatness – Sifting dry ingredients might seem unnecessary, but it’s essential for avoiding dense and lumpy brownies. Cocoa powder and confectioners’ sugar are two ingredients that always warrant sifting.
PRO TIP/ KITCHEN HACK
Chocolate Chips- If you add chocolate chips or other mix-ins, dust them with some flour to prevent them from sinking to the bottom during baking.
5. Bake to Perfection – Baking is where the magic happens. To avoid overbaking or underbaking, position your rack in the middle of the oven. This placement ensures even heat distribution. Please adhere to the baking times in your recipe, remembering that they vary slightly from oven to oven. Start checking for doneness when the minimum time is up, using the toothpick test at a strategic spot, like a crack or where you’ll cut later on. When you pull that toothpick out, and it has a few moist crumbs clinging on, that’s your cue. If it’s clean, they’re overdone; if it’s gooey with batter, they need more time. In the latter case, continue to bake in short intervals, checking frequently. If your brownies are cooking too fast, a foil tent can be a lifesaver, reflecting heat and slowing the cooking process.
6. Cool Out Time – Cooling might seem passive, but it’s as crucial as any active step in the brownie-baking process. Once out of the oven, your brownies are still baking from residual heat. To stop them from continuing to cook and potentially drying out at the edges, let them cool in the pan for about 15 minutes. This short period allows the brownies to settle and firm up without the edges becoming too hard. After this brief rest in the pan, use the edges of the parchment paper to lift the brownies out. This avoids sticking and breaking apart. Then, transfer them to a wire rack to cool completely. The air circulation from the wire rack helps prevent moisture from building up at the bottom, which could lead to a soggy texture.
7. Cooling Rack – The final cooling on the rack is a balancing act – too short, and your brownies may fall apart when cut; too long, and they could dry out. Aim for that sweet spot where they’re firm enough to cut but retain their moist, fudgy interior. Patience here pays off, as it can mean the difference between brownies that are just okay and brownies that are sublime.
PRO TIP/ KITCHEN HACK
Carry-over baking – The carryover heat will continue to bake your brownies even after being removed from the oven. This makes timing and your toothpick test not just steps but essential tools in your baking arsenal. Every batch baked is a step closer to mastering the art of the perfect brownie.
Small Batch Brownies
This small-batch brownie recipe delivers a perfect blend of textures: a thin, crispy top, a fudgy, chewy center, and a deliciously crisp outer edge. Ideal for a 9 x 5 inch pan, it yields 8 to 10 pieces, satisfying your chocolate cravings and leaving room for your next baking adventure. Enjoy every bite of these rich, decadent brownies!
Equipment
- digital scale
- large mixing bowl
- measuring cups and spoons
- sieve
- soft rubber spatula
- double boiler
- balloon whisk
- loaf tin 8×4 or 9×5
- baking paper
- oven thermometer
Ingredients
- 80 g flour
- 2 whole eggs room temperature
- 150 g granulated sugar
- 50 g brown sugar
- 20 g powdered sugar
- 15 g cocoa dutch processed
- ¼ tsp baking powder
- 56 g oil – natural oil canola
- 56 g butter – unsalted room temperature
- ¼ tsp fine sea salt
- 1 tsp vanilla extract
- 113 g chocolate semi-sweet
Instructions
- Preheat the Oven: To ensure the optimal temperature for baking, preheat the oven to 350℉ (177℃). Adjust the oven rack to the middle position to facilitate even heat distribution during the baking process.
- Prepare the Pan: Grease a 9×5 loaf pan with a thin layer of butter or non-stick cooking spray. Delicately line the bottom and sides of the pan with parchment paper, ensuring easy removal of the brownies once they are baked to perfection.
- In a large bowl, combine the sugar, oil, and vanilla extract. Mix these ingredients thoroughly using either a whisk or an electric mixer until they are well combined. Once the mixture is uniform, add the room-temperature egg and continue mixing until fully incorporated. This step ensures that the base of your batter is smooth and well-blended.
- Set up a double boiler by placing a small pot of water on the stove, filled about 2 inches high, and placing a heatproof glass bowl on top. Add the cut pieces of butter and chocolate to the bowl. Melt them together over low heat, stirring occasionally. Once fully melted, whisk in the Dutch-processed cocoa powder until the mixture is smooth and glossy.
- Sift the dry ingredients, specifically cocoa powder and confectioners’ sugar, to prevent lumps and ensure a smooth batter. This step is crucial for avoiding dense and lumpy brownies. Sifting helps to aerate the ingredients and remove any clumps, leading to a more even and light texture in the final product.
- If you’re adding chocolate chips or other mix-ins to your batter, dust them lightly with flour before incorporating. This simple trick helps to prevent them from sinking to the bottom during baking, ensuring an even distribution throughout your brownies.
- Position your oven rack in the middle to ensure even heat distribution. Follow the baking times specified in your recipe, but start checking for doneness at the minimum time using a toothpick. Insert it into a strategic spot, such as a crack or the intended cutting line. If the toothpick comes out with a few moist crumbs, the brownies are done. If it’s clean, they’re overdone; if it’s gooey with batter, they need more time. In this case, continue baking in short intervals, checking frequently. If the brownies are browning too quickly, cover them loosely with foil to prevent overcooking.
- Once the brownies are out of the oven, let them cool in the pan for about 15 minutes. This allows them to firm up without drying out. After this initial cooling period, use the edges of the parchment paper to lift the brownies out of the pan to avoid sticking or breaking. Transfer them to a wire rack to cool completely. The wire rack promotes air circulation, preventing moisture build-up at the bottom, which could lead to a soggy texture.
- Final cooling on the wire rack is essential for achieving the perfect texture. Cool the brownies until they are firm enough to cut but still retain their moist, fudgy interior. Patience at this stage pays off, as it ensures your brownies are not only easy to slice but also deliciously moist and sublime. Aim for that sweet spot where they are cool to the touch but not dry.
- Wait until the brownies are at room temperature for the cleanest cuts. Transfer them to a cutting board and use a sharp knife for precise slices. Rinse or wipe the blade between cuts to keep the edges of your brownies sharp.
Tried this recipe? Tag us @Gooddaytobake on instagramLet us know how it was!