Ingredients for Orange Yogurt Muffins
▪️ Greek yogurt –Greek yogurt gives the muffin some extra moisture, a tender crumb, and a tang. I also think it enhances the muffin’s orange flavor and zest. Bring the yogurt to room temperature, and add your milk and Greek yogurt to a cup. Mix it until thoroughly combined and set aside until you need to add it to the muffin recipe.
▪️ Orange zest – Many citrus fruits, another fruit at the supermarket, are often coated with a wax spray, which gives oranges, lemons, and apples a glossy finish. Whenever I’m using any citrus fruit, especially fruit that needs to be zested for the outside layer – boil water and then fill a large bowl with hot water. Place the orange inside the bowl and allow it to submerge for at least 10 seconds. After removing the orange from the water, wipe the wax layer off with a clean towel (or a paper towel). Giving it a good wipe with the towel can also help remove any stubborn dirt. Heating the orange in the water will also loosen the juices inside – aiding in a more effortless squeeze.
▪️ Milk / Plant-Based Milk—You can use whole milk or substitute plant-based milk in this recipe. To create your DIY buttermilk, add 1 1/2 tsp of either lemon juice or distilled white vinegar to the milk, stir, and allow it to sit for 10 minutes. Your milk should naturally become thicker and have a tangy taste.
▪️ Granulated sugar + Brown Sugar – 3 tablespoons of granulated and brown sugar mixed.
▪️Butter – For this recipe, we will use unsalted melted butter. Melt it in the microwave for one or one and a half minutes. Let the butter completely cool down to room temperature before adding it to the sugar and orange juice
▪️Whole Egg – I like to use eggs from humanely certified farms and organic.
▪️All-Purpose Flour: This is just your good old all-purpose flour. You can also make this orange muffin recipe gluten-free by using one–to–one gluten-free flour.
▪️Vanilla—A good-quality extract or paste goes a long way. Try to avoid using imitation or essence flavoring in your bakes.
▪️Baking Powder / Baking Soda – Baking powder and baking soda are leaveners to help the batter rise and create an airy texture.
▪️Salt—In this recipe, I suggest using fine sea salt. You can opt to use alternative salts. Just keep in mind that each salt/brand has different levels of saltiness. Adjust your salt measurement accordingly.


PRO TIP/ KITCHEN HACK
Utilizing a convection oven: it is prudent to make a conscious adjustment by reducing the oven temperature by 25°F, accompanied by a corresponding reduction in baking time, as convection ovens tend to hasten the baking process.
How to make Orange Yogurt Muffins
1. Massage the zest and sugar—As you begin making your muffins, use the tips of your fingers to massage the zest into the sugar. After a few minutes of massaging, the sugar should resemble wet sand, and you should be able to smell a citrus aroma.
2. Add the orange juice and melted butter—Instead of creaming, melt the butter in a saucepan or double boiler and then add it with the sugar. Squeeze an orange for three tablespoons of juice. It’s best to add the orange juice to the sugar and orange zest later when combining other ingredients to avoid the mixture from separating and curdling.
3. Allow the mixture to cool before combining it with beaten eggs – After adding the orange juice and melted butter, let the mixture cool before beating the eggs with an electric hand mixer or a whisk until light and fluffy.
4. Gently fold in sifted dry ingredients – Finally, gently fold in the sifted dry ingredients, often alternating with liquid ingredients like milk or buttermilk. The goal is to mix just enough to incorporate the ingredients while maintaining the airiness of the batter. Be careful not to mix over, as this could result in a tough muffin.
5. Rest the batter – Rest the muffin batter at room temperature for about an hour and cover it with a lid or a clean kitchen towel. This will allow the flavors of the liquids to develop further and give the flour time to absorb moisture evenly.
6. Divide the batter – Use a large cookie scoop to evenly distribute the batter between the lined/greased muffin cavities.
7. Bake and check for doneness – Bake the muffins at 400°F for 18 minutes. Test for doneness by inserting a toothpick or a cake tester into the center of the muffins. It should come out clean with no loose crumbs attached.
8. Allow the muffins to cool—Once the muffins are done baking, allow them to cool inside the muffin tray for 2 to 3 minutes before using a knife to remove them and transfer them to a wire rack to continue cooling for at least 30 minutes before adding the glaze.
PRO TIP/ KITCHEN HACK
Touch Test: This involves delicately pressing on the cake’s surface; if it bounces back and resumes its original form, it’s a clear indication that it’s ready to be removed from the oven. More Baking Needed: if the cake feels moist, fails to spring back, or bears an indentation, it necessitates additional baking time.
Toothpick: Poke a toothpick into the edge/center of the cake, when you remove the toothpick there should be no crumbs attached. More Baking Needed: if the toothpick is wet or has any batter stuck to it, continue baking and checking the cake every 2 minutes with the toothpick until it is pulled out clean with no crumbs.
The Orange Glaze
Glaze: In a small/medium bowl, sieve your powdered sugar – older powdered sugar tends to clump up easily so this step is important, if it is a fresh bag you can skip this step (however, I prefer to sieve every time regardless new or old). Stir the liquid into the sugar, starting with just a few drops of orange juice. You want the consistency thick but still thin enough to drip the glaze onto the muffin.

PRO TIP/ KITCHEN HACK
Consistency: If the glaze is too runny, add more powdered sugar. Alternatively, if it is too thick, add a few drops of orange juice and stir until you reach the desired consistency.

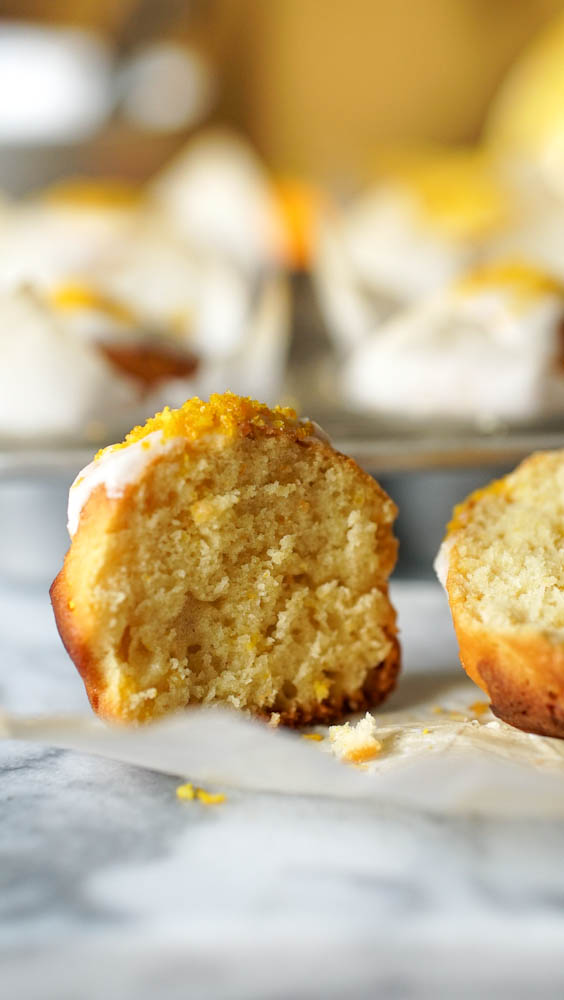
Orange Yogurt Muffins
These orange yogurt muffins blend tangy and sweet, with fresh orange zest and juice for a vibrant citrus punch. Greek yogurt and buttermilk create a tender crumb and a hint of tanginess. Perfect for summer, they’re extra delicious with orange glaze and zest. Enjoy every bite!
Equipment
- digital scale
- muffin tray
- muffin liners
- measuring cups and spoons
- large mixing bowl
- sieve
- electric mixer
- soft rubber spatula
- large cookie scoop
- oven thermometer
Ingredients
Muffins
- 150 g flour all purpose
- 30 g granulated sugar
- 45 g brown sugar
- 56 g melted butter cooled
- 45 ml orange juice freshly squeeze
- 45 ml buttermilk
- 45 ml greek yogurt plain
- 1.5 tbsp orange zest
- 1 tsp baking powder
- ¼ tsp baking soda
- ¼ tsp salt
Glaze
- 2 tbsp icing sugar
- ½ tsp orange juice
- 2 tsp orange zest
Instructions
- To begin, combine the citrus zest and sugar in a medium-sized bowl. Using the tips of your fingers, gently massage the zest into the sugar. Continue this process for a few minutes until the sugar resembles wet sand and you can clearly smell the citrus aroma. This step ensures the zest releases its oils into the sugar, enhancing the flavor of your muffins.
- Next, melt the butter in a saucepan or double boiler. While the butter is melting, squeeze an orange to extract 3 tablespoons of juice. Add this orange juice to the sugar and zest mixture, stirring until well combined. Once the butter is fully melted, pour it into the mixture and stir until smooth. This method helps to evenly distribute the citrus flavor throughout the batter.
- Allow the mixture to cool to room temperature. Meanwhile, beat the eggs in a separate bowl until they are light and fluffy, using either an electric mixer or a whisk. Once the butter mixture has cooled, gradually add it to the beaten eggs, mixing until the ingredients are well incorporated. This cooling step prevents the eggs from cooking prematurely and ensures a smooth batter.
- In a separate bowl, sift together the dry ingredients, such as flour, baking powder, and salt. Slowly fold these sifted dry ingredients into the wet mixture, alternating with liquid ingredients like milk or buttermilk. Use a rubber spatula for the final addition of dry ingredients, gently folding until the last streak of flour disappears. Be careful not to over-mix to maintain the batter’s airiness.
- Cover the bowl of muffin batter with a lid or a clean kitchen towel and let it rest at room temperature for one hour. This resting period allows the flour to fully absorb the moisture and the flavors to meld together. About 30 minutes into the resting time, preheat your oven to 400°F (200°C) and position a rack in the middle of the oven.
- After the batter has rested, use a large cookie scoop to evenly distribute it into the lined or greased muffin cavities. Filling each cavity uniformly ensures that the muffins bake evenly. This step also helps in achieving a consistent size for each muffin.
- Place the muffin tray in the preheated oven and bake at 400°F (200°C) for 18 minutes. To check for doneness, insert a toothpick or cake tester into the center of a muffin. The muffins are ready if the toothpick comes out clean, with no loose crumbs attached. This indicates that the muffins are fully baked and have a tender crumb.
- Once the muffins are done baking, remove the tray from the oven and allow the muffins to cool in the tray for 2-3 minutes. This initial cooling helps to set their structure. Then, use a knife to carefully lift the muffins out of the tray and transfer them to a wire rack. Let them cool completely for at least 30 minutes before drizzling with glaze. Cooling on a wire rack prevents the muffins from becoming soggy and ensures they reach the perfect texture for glazing.
Tried this recipe? Tag us @Gooddaytobake on instagramLet us know how it was!