How to make Brown Butter Chocolate Chip Cookies
1. Brown the Butter – To brown the butter, begin by melting the butter in a heavy-bottomed pot on the stove over low-medium heat. Constantly stir the butter to prevent it from burning. The butter should start to foam after 3-5 minutes; the milk particles separate at this stage. Keep stirring as the butter turns into a deep amber color. Be sure not to step away, as it can quickly go from amber to burnt in less than a minute. Once the butter reaches a deep amber color, transfer it to a heatproof bowl.
2. Add a tablespoon of water or an ice cube—Adding water to the browned butter helps restore the moisture and liquid that evaporates during heating, contributing to the perfect texture of your cookies.
3. Combined sugar and butter -In a large bowl, combine the sugar and browned butter, then cream them together using an electric mixer or whisk until well combined and lighter in texture.
4. Add egg and vanilla -After creaming the butter and sugar, add the egg and vanilla, and beat the mixture for about 45 seconds until smooth and thoroughly combined.
5. Sieve dry ingredients -Sift the dry ingredients into the bowl and gently mix them with a rubber spatula until only a tiny amount of flour is visible.
6. Toss in chocolate chips -Now, it’s time to add the chocolate chips. Gently fold them in with the rubber spatula until the last streak of flour disappears.
7. Chill for 12 hours (2 hours min)—To allow the flavors to develop, Chill the dough for at least 2 hours, but ideally 12-24 hours. Remember, the longer the chilling, the less the cookies will spread.

PRO TIP/ KITCHEN HACK
Tray Placement – Evenly spread cookies out on one cookie sheet tray. Cookies bake most evenly when baked only one sheet at a time.
PRO TIP/ KITCHEN HACK
Perfect Circle Cookies – Straight out of the oven, use a cookie cookie cutter a little larger than you cookies diameter (or a kitchen glass) and swirl the cookie inside the cutter/glass so its touching its edge. The cookie’s edges should start to smooth out and the cookie itself should begin to become more round.

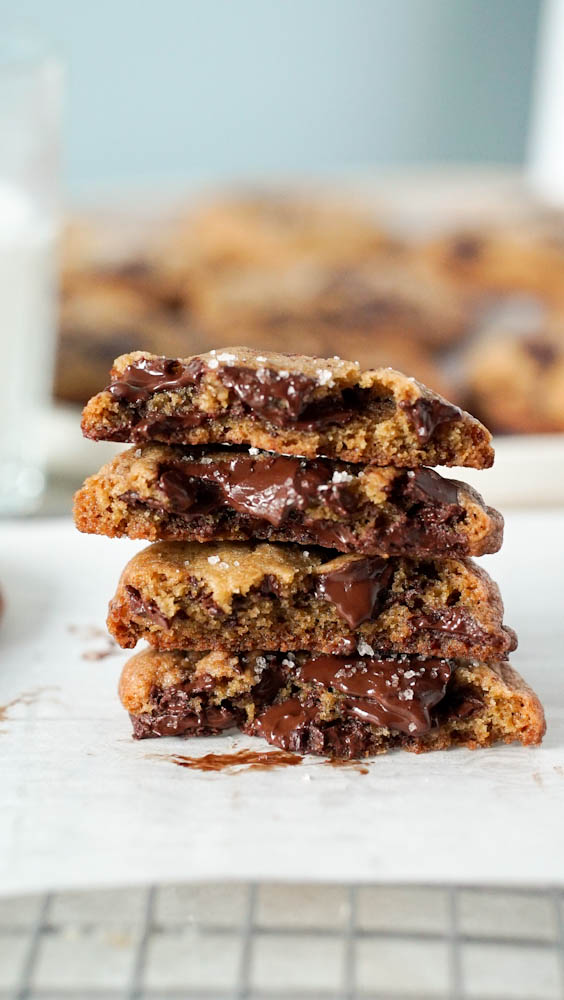
Brown Butter Chocolate Chip Cookies
These brown butter chocolate chip cookies are an irresistible treat with the perfect balance of sweet and salty flavors. The browned butter adds a rich, nutty caramel undertone, complementing the semi-sweet chocolate chips and a hint of sea salt.
Equipment
- digital scale
- balloon whisk
- measuring spoons
- electric mixer optional
- large mixing bowl
- soft rubber spatula
- large cookie scoop
- baking paper
- sheet pan
- oven thermometer
Ingredients
- 1 ½ cup (190 g) flour
- 1/2 teaspoon baking powder
- 1/2 teaspoon baking soda
- 1/2 tsp fine salt
- ⅓ cup (75 g) white sugar
- ⅓ cup (75 g) brown sugar
- 1 tsp vanilla – extract/paste
- 113 g butter -unsalted room temperature
- 1 whole egg room temperature
- 1 cup chocolate bar high-quality, chopped
Instructions
- In a heavy-bottom pot, begin to melt your butter on the stove over low-medium heat. Stir the butter constantly to prevent burning. After 3-5 minutes, you will notice the butter starting to foam and the milk particles separating. Continue stirring as the butter turns a deep amber color. Do not step away during this process, as the butter can burn quickly. Once it reaches the desired color, transfer the liquid to a heatproof bowl, add a tablespoon of water or an ice cube, and allow it to cool.
- Adding water to the browned butter helps restore the moisture that evaporated during the heating process. Without this added water, the cookies can become dry. This step is essential to maintaining the correct texture and consistency in your final product.
- In a large bowl, add the sugar followed by the cooled brown butter. Cream these together using an electric mixer or a strong hand and whisk until fully combined and the mixture is lighter in texture. This step ensures the sugar is well incorporated into the butter, creating a smooth and even base for your cookies.
- Once your butter and sugar are mixed, add the egg and vanilla extract. Continue to beat the mixture for about 45 seconds until the batter is smooth and all ingredients are fully incorporated. This step adds richness and flavor to the dough.
- Add your dry ingredients through a sieve into the wet mixture. Using a rubber spatula, gently mix until only a small amount of flour is visible. Sifting helps to aerate the flour and prevent lumps, ensuring a light and even dough.
- Fold in the chocolate chips using the rubber spatula until the last streak of flour disappears. This ensures the chocolate chips are evenly distributed throughout the dough. Be careful not to overmix, as this can affect the texture of the cookies.
- Chill the dough for at least 2 hours, but ideally for 12-24 hours. Chilling allows the flour to absorb the flavors of the brown butter and vanilla, deepening the cookie’s flavor. The longer the dough chills, the less the cookies will spread during baking.
- Tray Placement – Spread cookies evenly on one cookie sheet tray. Baking one sheet at a time ensures the cookies bake evenly.
- Start checking the cookies at the earliest suggested baking time, as cookies can go from pale to over-browned quickly. Since oven temperatures can vary, this helps prevent overbaking.
- Be careful not to overbake your cookies. They are ready to be removed from the oven once the edges become a deep golden color. This indicates the cookies are baked through while remaining soft and chewy in the center.
- Remove the cookies from the cookie sheets as soon as they are firm enough to transfer. Place them on wire racks to cool completely, which helps them remain crisp and prevents further cooking from the residual heat of the baking sheet. Once cooled, store the cookies in an airtight container for the best texture.
- Perfect Circle Cookies – Straight out of the oven, use a cookie cutter slightly larger than the cookies or a kitchen glass to swirl the cookie inside the cutter/glass so it touches the edge. This will smooth out the edges and make the cookies more round.
Tried this recipe? Tag us @Gooddaytobake on instagramLet us know how it was!